Version: 1.11.4 and higher (there may be separate notes about versions compatibility)
Installation
To add a WordPress Plugin using the built-in plugin installer:
- Go to "Plugins -> Add New".
- Click "Upload Plugin" button.
- Choose downloaded ZIP file and click "Install Now" button.
- Make sure that you click on "Activate the plugin", now you have installed directory plugin.
- Create new page with [webdirectory] shortcode or with [webdirectory custom_home=1] if you wish to build custom home page. Also you may create additional pages with [webdirectory-submit] and [webdirectory-dashboard] shortcodes if you wish your logged in users to manage their listings, invoices and profile on the frontend dashboard page.
- (optional) Create new page with [webdirectory-listing] shortcode to build special page for single listings. If you want separate "template" page for every single listing - create new page with this shortcode.
Special note: additional pages with [webdirectory-submit] and [webdirectory-dashboard] shortcodes must not have main directory page with [webdirectory] shortcode as parent.
WordPress Multisite installation
Upload the plugin on Network Admin plugins page, but don't activate it. It is not allowed to enable "Network Activate" for the plugin on Network plugins page, instead activate it on the plugins page of each sub-site. Also note, that each activation on each sub-site requires separate license.
How to update
First of all download the latest version of the plugin from Codecanyon. Simply unpack the archive with new version and upload all new files and folders to your plugin folder on the server (usually the name of folder is "wp-content/plugins/codecanyon-6463373-web-20-directory-plugin-for-wordpress/"), that is all, the system will automatically execute required operations. All files and folders must be uploaded using FTP-client (like FileZilla) or using file manager in your hosting control panel. It would be better to make backups of the database and all plugin files before update. All your configurations, settings and data will be saved after update, you will not lose anything. Files modifications must be made according to customization instructions, in such case they will be saved during update.
Getting started
So you get your instance of the plugin installed and ready for use. Now lets set up most important settings and options. Note that you may manage and change following settings in any time you want, but it is recommended to set up before your directory site becomes public. Here is some recommendation on how to get familiar with the plugin in right way:
- first of all configure your directory using special built in settings
- set up listings levels, by default there is one "Standard" level
- manage existing core fields and create additional content fields for your needs
- build your own directory categories tree and tags
- work with locations: define directory locations tree and look at locations levels
- create some test listings and explore how listings behave themselves at the frontend, which additional options and tools they have
Directory settings
First of all look at "Directory Admin -> Directory settings" page. There are some separate tabs with own groups of settings.
General settings tab
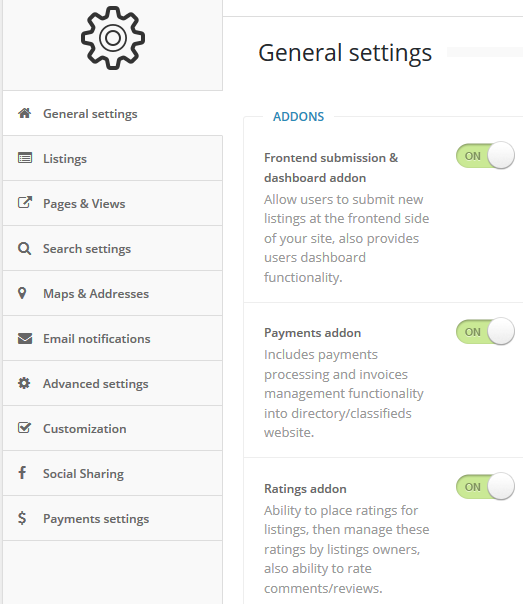 There are 3 available addons, if you do not need unnecessary functionality - do not enable them:
Frontend submission & dashboard addon - allow users to submit new listings at the frontend side of your site, also provides users dashboard functionality.
Payments addon - includes payments processing and invoices management functionality into directory/classifieds website.
Ratings addon - ability to place ratings for listings, then manage these ratings by listings owners.
AJAX Loading
Use AJAX loading - load maps and listings using AJAX when click on search button, sorting buttons, pagination buttons.
Initial AJAX loading - initially load listings only after the page was completely loaded (not recommended).
Display "Show More Listings" button instead of default paginator - when switched off - default paginator will be used.
Titles, Slugs and Permalinks
Directory title - this string will appear in the title of all frontend pages related with the directory plugin. This will be rewritten when WP SEO by Yoast plugin was activated.
Listing slug - this is a part of URL for single listing page, for example, in this URL http://www.yoursite.com/directory/web-listing/listing/ listing - is the name of listing and web-listing - is the slug. Listing slug take part in some permalinks structures, see below about listings permalinks structure.
Category slug - this is a part of URL for categories sections, for example, in this URL http://www.yoursite.com/directory/web-category/business/ business - is the name of category and web-category - is the slug.
Location slug - this is a part of URL for locations sections, for example, in this URL http://www.yoursite.com/directory/web-place/united-states/los-angeles/ united-states/los-angeles - is the path of locations tree and web-place - is the slug.
Tag slug - this is a part of URL for tags sections, for example, in this URL http://www.yoursite.com/directory/web-tag/service/ service - is the name of tag and web-tag - is the slug.
Notice about slugs: Slugs must contain only alpha-numeric characters, underscores or dashes. All slugs must be unique and different.
Listings permalinks structure - set up permalinks structure of single listings pages. Examples of listings URLs:
- /%postname%/ - http://www.yoursite.com/directory/listing-name/
- /%post_id%/%postname%/ - http://www.yoursite.com/directory/644/listing-name/
- /%listing_slug%/%postname%/ - http://www.yoursite.com/directory/business-listing/listing-name/
- /%listing_slug%/%category%/%postname%/ - http://www.yoursite.com/directory/business-category/listing-name/
- /%listing_slug%/%location%/%postname%/ - http://www.yoursite.com/directory/business-place/listing-name/
- /%listing_slug%/%tag%/ - http://www.yoursite.com/directory/business-tag/listing-name/
/%postname%/ works only when directory page is not front page. When following structures is activated: /%listing_slug%/%category%/%postname%/, /%listing_slug%/%location%/%postname%/ and /%listing_slug%/%tag%/%postname%/ only first category, location or tag of the listing is used.
Frontend submission and dashboard
These are additional settings for frontend submission if appropriate addon was enabled.
Select frontend submission login mode -
- login required - logged in users have an ability to manage their listings, invoices and profile on the frontend dashboard page.
- necessary to fill in contact form - after successful submission WordPress creates new user profile. If user with entered email already exists in the system - it doesn't required to create new profile and listing will just be assigned with existed user. Later admin may manage and contact new user when needed. For new users registration email with newly generated password will be sent.
- not necessary to fill in contact form - the same behaviour as for previous option, but it does not required to enter contact info. For empty contact form the system creates anonymous user. Registration email will be sent when user enters contact email.
- do not even show contact form
Post status after frontend submit - define which status listing post will receive after successful submission: Pending Review, Draft or Published.
Post status after listing was modified - define which status listing post will receive after modification: Pending Review, Draft or Published.
Enable submit listing button - enable this option if you wish your users to submit new listings for the directory. Also the page with [webdirectory-submit] shortcode required.
Hide top admin bar at the frontend for regular users and do not allow them to see dashboard at all - when this option enabled - regular user will never see backend of your site. It is recommended to enable when you have the page with [webdirectory-dashboard] shortcode.
Allow users to manage own profile at the frontend dashboard - enable this option if you wish your users to manage own profile at the dashboard.
Enable listings tags input at the frontend - during listing creation/edition you may hide tags input.
Require Terms of Services on submission page? - select or create new WordPress page containing your TOS agreement and assign it using this setting.
Use custom login page for listings submission process - when login required before submission user have to login using default login form. You may use any 3rd party plugin to make custom login page and assign it with submission process using the dropdown above.
Use custom login page for login into dashboard - you may use any 3rd party plugin to make custom login page and assign it with login into dashboard using the dropdown above.
Claim Functionality
Enable claim functionality - enable/disable claim functionality at the frontend. When enabled each listing has option "allow claim", by checking this option you allow registered users to claim this listing. When claim allowed – the button "Is this you ad?" appears on listing's details page, this button opens claim form. This button will not appear when user logged in as listing owner, also when no page with [webdirectory-dashboard] shortcode exists.
When claim request was sent – notification about claim for this listing will be sent to the current listing owner.
After approval claimer will become owner of this listing and will receive email notification about successful approval.
Also there is the option in CSV importer to set up all imported listings as claimable.
Approval of claim required - when switched on each claimed listing requires approval of claim by current listing owner. In other case claim will be processed immediately without any notifications.
What will be with listing status after successful approval? - when set to "just approval" option – the status of claimed listing will not be changed after approval. "Expired status" option means that after approval of claimed listing – it becomes expired and new owner have to renew it to make listing active. Renewal of listing may be payment option.
Hide contact form on claimable listings - just hide contact form when listing is set to be claimed.
Hide claim metabox at the frontend dashboard - with this setting only admin may set up listing to be claimed.
Listings settings tab
Show listings on index - this option controls whether to show listings on index page.
Number of listings on index page - also this number of listings will take part in building Google maps in appropriate page.
Number of listings on excerpt pages (categories, locations, tags, search results) - also this number of listings will take part in building Google maps in appropriate page.
Place listing images gallery on separate tab? - when enabled - all additional images those were assigned with the listing will be placed on a separate tab like map, comments, contact form or videos. When disabled - they will be placed under the logo image of current listing.
Enable contact form on listing page - whether to show contact listing owner form in a separate tab on current listing page.
Contact Form 7 shortcode - The plugin was fully integrated with Contact Form 7 plugin. Insert shortcode generated by CF 7 plugin and CF 7 form will be displayed instead of standard contact form. This will work only when CF 7 plugin enabled, otherwise standard contact form will be displayed.
Enable bookmarks list - this option allows to enable/disable "My bookmarks" functionality: if enabled - at the frontend on listings pages it shows "Add Bookmark" and "Remove Bookmark". When user clicks to add in bookmarks - the system saves current listing in his personal list, user may click "My bookmarks" and show all his saved listings. Here is the image how listings frontend panel looks:

Show print listing button - show/hide print listing button on current listing page.
Show listing in PDF button - show/hide "Save listing in PDF" button on current listing page. Please note, that this feature uses free 3rd party service pdfmyurl.com. The speed and quality of this service depends on your own server's and site's accessibility.
Allow regular users to change listings expiration dates - with this enabled setting listings owners may manually set expiration dates of listings, after that date the status of listing become expired. The change of expiration dates available only for listings with limited active period, not for eternal listings. Administrators may control expiration dates even if this option is disabled.
Hide comments number from index and excerpt pages - the number of comments or reviews will be hidden from index and excerpt pages and visible only on listing pages on special tab.
Hide listings creation date - listings creation date may be hidden at the frontend at all.
Listings comments mode - when the option "As configured in WP settings" was selected - it depends on WordPress discussion settings such as "Allow people to post comments on new articles" and also individual listing setting "Allow comments".
Priority of opening of listing tabs - Set up priority of tabs those are opened by default. If any listing does not have any tab - next tab in the order will be opened by default.
Enable statistics functionality - statistics charts visible on frontend users dashboard. At the backend only total number of clicks visible.
Breadcrumbs settings
Enable breadcrumbs - show/hide breadcrumbs links on single listings pages.
Hide home link in breadcrumbs - "Home" link will be hidden.
Breadcrumbs mode on listing single page - examples of breadcrumbs:
- %listing title% - Home » Super Shopping in LA
- %category% » %listing title% - Home » Business Services » Advertising, Marketing & PR » Super Shopping in LA
- %location% » %listing title% - Home » United States » California » Los Angeles » Super Shopping in LA
Listings logos & images
Enable lightbox on images gallery - switch on/off lightbox effect for images gallery on single listing pages.
Enable automatic rotating slideshow on images gallery - switch on/off auto slider for images gallery on single listing pages.
The delay in rotation (in ms) - the delay between rotation of slides.
Exclude logo image from images gallery on single listing page - logo image will be visible only on index and excerpt pages, it will be excluded from single listing page.
Enable default logo image - when logo image file was not uploaded the directory will show default image.
Default logo image - this image will appear when listing owner did not upload own logo.
100% width of images gallery on single listing page - this switcher controls how image gallery will appear on listing page. When 100% width was disabled - next setting will be used.
Images gallery width on single listing page (in pixels) - this option needed only when 100% width of images gallery is switched off. Images gallery on listing page places at the left side within provided width, right side contains other information.
Images gallery main slide mode - this setting needed to fit main slide for images proportions you preferred on your site: "Cut off image to fit width and height of main slide" for popular rectangular images (in this case images may be scaled and cut off) or "Full image inside main slide" for tall and thin images (so images will be scaled to be fully placed inside main slide).
Description & Excerpt settings
Enable description field - main description field may be hidden from listing.
Enable summary field - summary/excerpt field may be hidden from listing.
Excerpt max length - insert the number of words you want to show in the listings excerpts.
Use cropped content as excerpt - when excerpt field wasn't filled in by user - cropped main content will be used.
Strip HTML from excerpt - check the box if you want to strip HTML from the excerpt content only.
Pages & views tab
Excerpt views
Enable views switcher - when enabled - views switcher will appear on all excerpt pages of the directory.
Listings view by default - do not forget that selected view will be stored in cookies as preferred view.
Number of columns for listings Grid View - from 2 to 4 columns for this type of view.
Aspect ratio of logo in Grid View - 1:1 (square), 4:3, 16:9 or 2:1
Wrap logo image by text content in List View - when enabled logo image will be wrapped by text - it gives more useful use of space for long texts on excerpt pages.
Listing thumbnail logo width (in pixels) in List View - control width of logo image in List view.
Categories settings
Show categories list on index and excerpt pages? - whether to show categories list on directory pages or not.
Categories nesting level - when set to 1 - only root categories will be listed.
Categories columns number - divide categories into 1, 2, 3 or 4 columns.
Show subcategories items number - this is the number of subcategories those will be displayed in the table, when category item includes more than this number "View all subcategories ->" link appears at the bottom.
Show category listings count? - whether to show number of listings assigned with current category in brackets.
Locations settings
Show locations list on index and excerpt pages? - whether to show locations list on directory pages or not.
Locations nesting level - when set to 1 - only root locations will be listed.
Locations columns number - divide locations into 1, 2, 3 or 4 columns.
Show sublocations items number - this is the number of sublocations those will be displayed in the table, when location item includes more than this number "View all slocations ->" link appears at the bottom.
Show location listings count? - whether to show number of listings assigned with current location in brackets.
Sorting settings
Show order by links block - this block consists of options links those were allowed to sort by.

Allow sorting by date - switch on/off sorting by date.
Allow sorting by title - switch on/off sorting by title.
Allow sorting by distance when search by radius - "Distance" option link will appear when user searches listings by distance.
Default order by - select by which parameter listings will be ordered by default.
Default order direction - select "ascending" or "descending" direction.
Exclude listings with empty values from sorted results - content fields those weren't filled in become empty after listing save, with enabled setting sorting by content field will exclude such listings from sorted results.
Sticky and featured listings always will be on top - when switched off - sticky and featured listings will be on top only when listings were sorted by date.
Ratings settings
All these settings appears when ratings addon is active. Ability to place ratings may be managed for each listing levels separately. There are 3 settings:
Only registered users may place ratings - this setting restricts unregistered users to rate listings, when this setting unchecked - anyone can rate any listing. Please note, that when user places new rating, the plugin creates new record with ID of registered member, for anonymous users - the plugin stores their IPs, also the plugin saves cookie in user's browser.
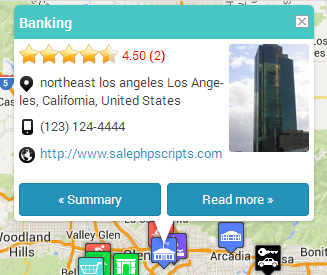
Show rating in map info window - renders 5-stars rating in map info window.
Allow users to flush ratings of own listings - when this option was checked - listing owner has an ability to flush current rating of his listing.
Allow sorting by ratings - switch on/off sorting by ratings.
Search settings tab
Display search block in main part of page? - note, that search widget is independent from this setting and this widget renders on each page where main search block was hidden.
Show "What search" section? - show/hide "What search" section in search block. This setting is actual for both: main search block and widget.
Show "Where search" section? - show/hide "Where search" section in search block. This setting is actual for both: main search block and widget.
Show keywords search? - show/hide keywords field in search block. This setting is actual for both: main search block and widget.
Show locations search? - show/hide locations dropboxes in search block. This setting is actual for both: main search block and widget.
Show address search? - show/hide address field in search block. This setting is actual for both: main search block and widget.
Show listings counts in locations search dropboxes? - whether to show number of listings assigned with current location in brackets.
Show categories search? - show/hide categories dropboxes in search block. This setting is actual for both: main search block and widget.
Show listings counts in categories search dropboxes? - whether to show number of listings assigned with current category in brackets.
Show locations radius search? - show/hide radius slider in search block. This setting is actual for both: main search block and widget.
Dimension in radius search - which dimension to use: miles or kilometers.
Minimum radius search - set the minimum value for radius slider.
Maximum radius search - set the maximum value for radius slider.
Default radius search - this value will be set by default.
Maps & Addresses tab
Maps settings
Show map on index page? - whether to show Google map on index directory page.
Show map on excerpt page? - whether to show Google map on excerpt directory pages.
Show directions panel for individual listing map? - frontend users may pave the route on Google map and get the list of directions for selected location separately, note that there may be more than 1 location of each listing.
Directions functionality - built-in onsite routing or redirect to build routes on Google Maps service (tablet and mobile devices may use own maps applications)
Default Google Maps zoom level - this zoom level is used during new listing creation, the range is 1-19. 1 - the lowest zoom (whole world), 19 - the highest zoom (individual buildings, if available).
Google Maps style - ability to set custom Google Map style, by default there are 10 map styles, information about map styles stores in php array in "maps_styles.php" file.
Default map height (in pixels) - default map height on main directory pages.
Show cycle during radius search? - by this option you may hide red transparent cycle that appears on map during locations search in radius.
Enable clusters of map markers? - when checked - map markers will be grouped in clusters.
Addresses settings
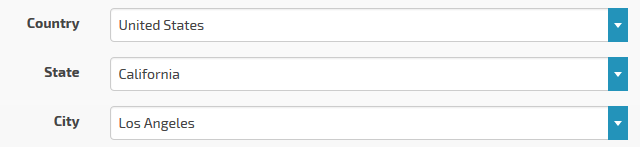
Default country/state for correct geocoding? - this value needed when you build local diirectory, all your listings place in one local area - country or state. You do not want to set countries or states in the search, so this hidden string will be automatically added to the address for correct geocoding when you create/edit listings.
Order of address lines - Order address elements as you wish, commas and spaces help to build address line.
Enable address line 1 field - enabled/disable address line 1 field in locations metaboxes.
Enable address line 2 field - enabled/disable address line 2 field in locations metaboxes.
Enable zip code - enabled/disable zip code field in locations metaboxes.
Enable additional info field - enabled/disable additional info field in locations metaboxes.
Enable manual coordinates fields - enabled/disable manual coordinates fields in locations metaboxes.
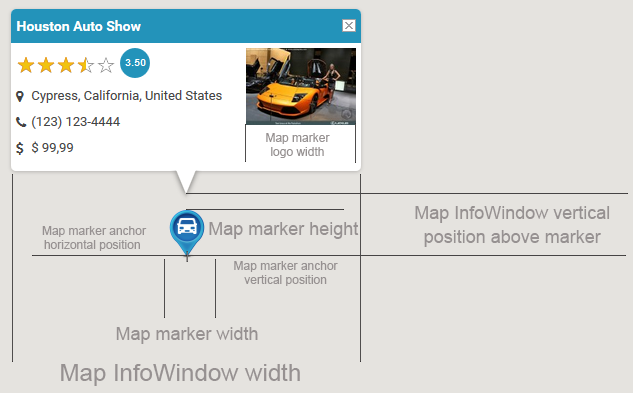
Map markers & InfoWindow settings
Type of Map Markers - 2 possible types: Font Awesome icons (recommended) - icons from the Font Awesome set will be used, PNG images - custom images from "w2dc/resources/images/map_icons/icons/" folder. Site administrator may upload additional icons in this folder via the Files manager of hosting control panel or via FTP.
Using Font Awesome icons it is possible to select default icon and color of map marker. When "Custom markers on google map" option enabled in listings levels settings - users will be able to select specific icon for each marker. On "Directory listings -> Directory categories" page it is allowed to select specific marker icon and color for each category.
![]()
Other settings related to custom PNG images. Do not touch these settings if you do not know what they mean. Modification of these settings needed when you use own custom map markers icons with own sizes. If you are using custom markers images, note that they must be of same size.
Email notifications tab
Days before pre-expiration notification will be sent - one time email with pre-expiration notification text will be sent to the email box of listing owner.
Pre-expiration notification - 2 tags are used: [listing] - listing name and [days] - number of days from previous setting.
Expiration notification - 2 tags are used: [listing] - listing name and [link] - the link on the listing.
Registration of new user notification (this setting is from frontend submission addon) - 4 tags are used: [author] - listing author name, [listing] - listing name, [login] - user login, [password] - user password.
Notification to admin about new listing creation (this setting is from frontend submission addon) - 3 tags are used: [user] - listing author name, [listing] - listing name, [link] - the link on the listing.
Notification of claim to current listing owner (this setting is from frontend submission addon) - 5 tags are used: [author] - the name of current author of the listing, [listing] - listing name, [claimer] - claimer user name, [link] - the link to approve or reject the claim, [message] - message from claimer.
Notification of successful approval of claim (this setting is from frontend submission addon) - 3 tags are used: [listing] - listing name, [claimer] - claimer user name, [link] - the link on the listing.
Advanced settings tab
Google API
Google browser API key - get your Google API key here, following APIs must be enabled in the console: Google Maps JavaScript API, Google Static Maps API and Google Maps Directions API.
Google server API key - get your Google API key here, following APIs must be enabled in the console: Google Maps Geocoding API for radius search functionality.
JavaScript & CSS
Enable lightbox slideshow? - this adds functionality to watch listings images as full size animated slideshow. Also may be disabled in order to avoid conflicts with other javascript slideshow plugins.
Do not include jQuery UI CSS - some themes and 3rd party plugins include own jQuery UI CSS - this may cause conflicts in styles.
Miscellaneous
Enable autocomplete on addresses fields - disable if you are using predefined locations tree and do not want to see country, city, e.t.c. in the input autocomplete field.
Enable "Get my location" button on addresses fields - enable/disable geolocation button on addresses fields.
reCaptcha settings
reCaptcha is used on contact listing owner forms and frontend submission form. You may get your reCAPTCHA API Keys here
WPML Settings
This section appears when WPML plugin is active.
Enable frontend translations management (this setting is from frontend submission addon) - enable/disable management of translations on users frontend dashboard.
Customization tab
Color palettes
Compare palettes at the frontend - this setting enables at the frontend special interactive widget helping to compare color palettes. Do not forget to switch off this setting when comparison will be completed.
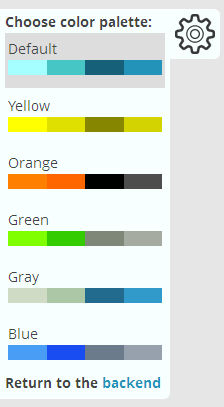
When you want to finish and hide this widget - click bottom link and you'll be redirected to the settings page, preferred color palette already will be selected and you just need to save changes. While you didn't disable comparison setting, this widget still be at the frontend.
Color palette - selecting any of palettes will automatically change some settings below, like links and buttons colors, backgrounds of search, categories, locations blocks, primary color, jQuery UI style and so on. Changes will not appear untill you click save button.
It would be better to experiment and test other customization settings directly on the site.
Social Sharing tab
Note, that 3rd party social sharing plugins aren't able to share single listings pages, so instead you have to use built-in social sharing buttons.

Buttons style - there are 3 sets of buttons, image files place in subfolders of "resources/images/social/".
Include and order buttons - choose which social sharing services you need and order their buttons.
Enable counter - enable/disable counter near social sharing buttons. Note, that enabled counter takes some time to load social sharing block on the page.
Buttons place - some possible places for social sharing block on the page.
Social buttons width - this setting controls the size of buttons.
Payments tab
This tab appears after activation of payments addon.
General payments setting
Any services are Free for administrators - when this option checked - the system will never create invoices for administrators, all services always will be free for them.
Currency - the list of possible currencies used for payments.
Currency symbol or code - this symbol or code will appear on frontend/backend pages.
Currency symbol or code position - choose preferred position of currency symbol/code.
Decimal separator - decimal separator of price value, possible values: dot or comma.
Hide decimals in levels price table - show/hide decimals (cents) on levels price table at the frontend.
Thousands separator - the separator for thousands, millions, billions, ... Possible values: no separator, dot, comma or space.
Sales tax
Enable taxes - enable/disable taxes functionality.
Selling company information - this information will appear on invoice page.
Tax name - abbreviation, e.g. "VAT".
Tax rate - insert tax rate in percents.
Include or exclude value added taxes - do you want prices on the website to be quoted including or excluding value added taxes?
Bank transfer settings
Allow bank transfer - allow users to select "Bank transfer" payment method.
Bank transfer information - this information appear on print invoice page. Provide whole instructions and payment requisite.
PayPal settings
Business email - PayPal merchant email.
Allow single payment - when this option is checked - "PayPal" payment gateway available.
Allow subscriptions - when this option is checked - "PayPal subscription" payment gateway available. Only for listings with limited active period. Look at additional information.
Test Sandbox mode - allows to test the process of payment using PayPal sandbox credentials. You must have a PayPal Sandbox account setup before using this feature.
Stripe settings
Test secret key
Test publishable key
Live secret key
Live publishable key
The publishable key is used to generate credit card tokens and should be included with the HTML form. The secret key is used for all other API calls on the server-side.
Test Sandbox mode - Before activating your account, you can only interact with Stripe in test mode. With the exception of the ability to make a real charge to a credit card, all of Stripe's features are available in test mode.
Directory categories
Site admin may create/edit/delete special categories items. Management of directory categories tree has exactly the same functionality as standard WordPress categories, but these are separate items and have special administration page "Directory listings -> Directory categories".
Also custom icons may be associated with directory categories. Using Font Awesome icons it is possible to select specific marker icon and color for each category.
![]()
By default there are 77 icons files inside "resources/images/categories_icons/" folder of the plugin. Site administrator may upload additional icons in this folder via the Files manager of hosting control panel or via FTP.
Directory locations
There are 3 ways to provide locations functionality on directory site:
- Use predefined locations - this way users will be able to select for their listings only previously defined locations, autocomplete on addresses fields and "Get my location" button on addresses fields disabled, also search by address must be disabled on search form. So addresses fields will be used only to enter streets, buildings, postal codes, e.t.c.
- Use addresses fields - do not insert predefined locations. Users will work only with addresses fields, autocomplete function and "Get my location" button on addresses fields will help them. Addresses fields will contain whole information about country, state, city, region, streets, buildings, postal codes e.t.c. In this way default radius search value would be quite useful to get nearby locations in search results.
- All in one - usage of predefined locations and addresses fields. But in such case information in addresses fields may contain country, state, city, region, the same as selected predefined locations.

Predefined locations
Site admin may create/edit/delete special predefined locations items. Management of directory locations tree has exactly the same functionality as standard WordPress categories, but these are separate items and have special administration page "Directory listings -> Directory locations"
After locations levels were successfully configured and locations tree completed - users may select any predefined location from select boxes group on create/edit listing page.
Note, that there is an ability to select more than 1 location for each listing.
Locations levels
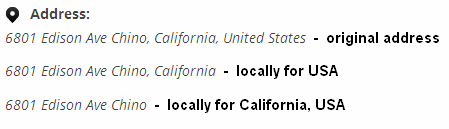
Just in some words, locations levels - these are names of nesting levels of directory locations tree. By default there are 3 locations levels: Country, State and City. Site admin has an ability to edit/remove or create new locations levels. But note, that in most of cases, whole chain of locations is required to set correct location point on Google maps. This means that when your directory will be used locally, for example, for users of only one country or state/region - do not delete unnecessary locations levels and locations, they are required to set correct location point at the Google map during listings creation. You'll just exclude needed locations levels from address line - yes, there is such option for each locations level, it allows to build custom address line at the frontend:
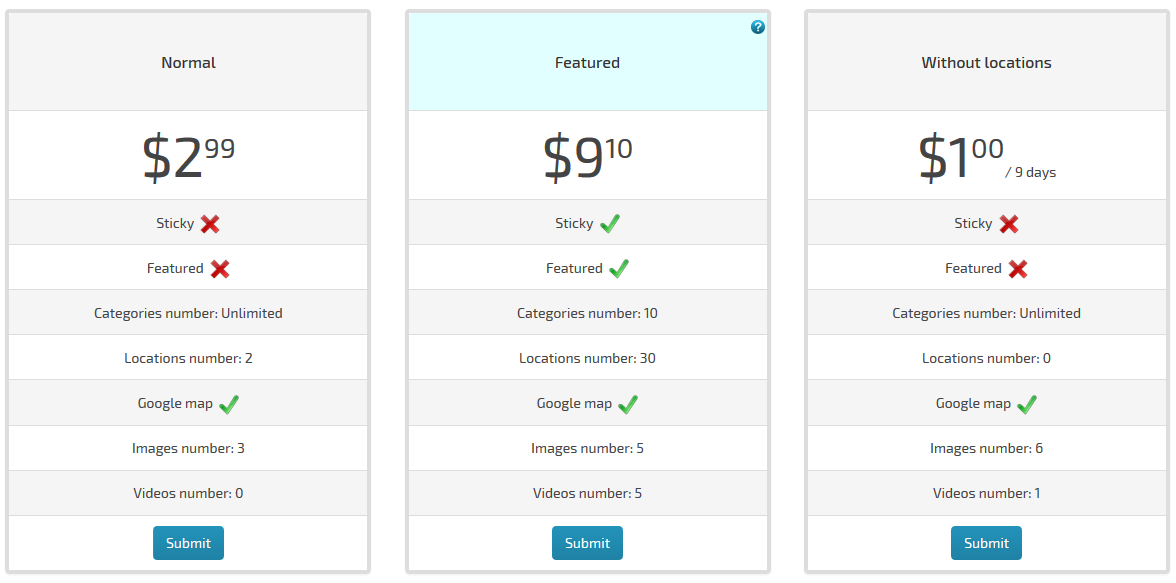
Listings levels
Levels of listings control the functionality amount of listings and their directory/classifieds conception.
Each listing may belong to one of defined levels, some may have eternal active period, have sticky status and enabled google maps, others may have greater number of allowed attached images or videos. It is perfect base for business model of your directory or classifieds site. On "Directory Admin -> Listings levels" page you may order existed levels by drag & drop rows in the table, the order of levels affects on listings sorting. Here is the list of listings levels options:
Level name - uses in the advertise table on the 1st step of listings creation. Special note: by default there is one standard listing level after installation of the plugin and the system doesn't show advertise table on the 1st step of listings creation, because it doesn't need to select the level for newly created listing.
Level description - uses only in the advertise table on the 1st step of listings creation.
Active period - in years, months and days. During this period the listing will have active status, then the status of listing become expired. After expiration listing owner or admin may prolong and renew listing.
Eternal active period - when enabled - listings of this level will never become expired.
Ability to raise up listings - if this option is checked - listing owner or admin may raise listing up in all lists those ordered by date.
Sticky listings - if this option is checked - listings of this level will be always sticked on top of all lists those ordered by date.
Featured listings - listings of this level have special css class "w2dc_featured", may be customized to be highlighted and attract attention.
Do listings have own pages? - this option could disable listings self pages, so there will not be any links to listings pages, just that information on excerpt pages.
Enable google map - users have an ability to place location(s) marker on Google map.
Enable listing logo - listings of this level own uploaded image as logo.
Listing logo size - the size of logo image especially for this listings level, possible size names: thumbnail, medium, large. Real sizes in pixels admin may configure on WordPress "Settings -> Media" page.
Images number available - the number of images allowed to upload for listings of this level.
Videos number available - the number of YouTube videos allowed to embed for listings of this level.
Categories number available - the number of categories allowed to be assigned with listings of this level. When during listing creation/edition user exceeded this number - the warning message will arise. Also it is possible to set unlimited number of categories.
Assigned categories - admin may define some special categories, those would be available for listings of this level. When during listing creation/edition user will click unavailable category checkbox - the warning message will arise.
With enabled ratings module here will be shown additional setting:
Ratings - enables ratings for all listings of this level.
Locations number available - An ability to set exact number of locations allowed for each level, by default only 1 location allowed.
Custom markers on google map - whether listings of this level may own custom marker icons on the map.
Also at this list may be 2 additional settings for payments module:
Listings price - by this price users will be charged for listings activation and renewal.
Listings raise up price - by this price users will be charged for listings raise up option.
Content fields & content fields groups
Additional content fields is one of the most important part of the directory and classifieds sites. They allow to add some piece of information to directory listings. Also content fields take part in the search of listings. On "Directory Admin -> Content fields" page you may order existed content fields by drag & drop rows in the table.

Each content field belongs to the type that defines its behaviour and display. You may hide field name, select custom field icon, set field as required, manage visibility on pages. Also listings may be ordered by some fields. Note that you may assign fields for specific categories and/or specific levels.
Content fields types:
- Content (core field type)
- Excerpt (core field type)
- Listing addresses (core field type)
- Listing categories (core field type)
- Listing tags (core field type)
- Text string
- Textarea
- Number
- Select list
- Radio buttons
- Checkboxes
- Website URL
- Date-Time
- Price
- Opening hours
There are 5 core field types, during initial installation the system creates 5 content fields - one field of each core field type. Core fields have special destination. This is impossible to delete any of these fields in future either create new field of core type, they will be always displayed on listing administration page (it is possible to disable content and excerpt fields on Listings settings tab). You can't edit slugs of these fields, can't order by them, can't set specific categories list, can't use in search.
Here are common settings of fields types:
Field name - required and used on listings administration page and in the search block.
Field slug - this option required and isn't able to edit for core fields.
Hide name - when checked - the name of field will be hidden at frontend pages.
Field description - this will be like a hint for users who fill in details into field.
Icon image - set own custom icon for any content field, this will be displayed at frontend pages. By default there are 316 icons files inside ‘resources/images/content_fields_icons/‘ folder of the plugin. Site administrator may upload additional icons in this folder via the Files manager of hosting control panel or via FTP.
Field type - it is possible to change field type, but only for non-core fields.
Is this field required? - most of types of fields can be set as required and some can not - listings categories, listings tags, listings addresses.
Order by field - listings may be ordered by content fields
On excerpt page - show value of this field on index and excerpt pages.
On listing page - show value of this field on listings pages.
On map - show value of this field in map info window. Address field always on top:
Search by this field? - take part in the search of listings. Some field types have special configuration options.
On advanced search panel? - when disabled - this field will appear in regular search block, when enabled - this field will be hidden by default and appear only in advanced search block
Now detail about each content field type separately:
Content (core field type)
At the backend this is richtext editor field to store general content of listings. Can't be ordered by its value, can't be searched by its value. By default this field is hidden on index and excerpt pages and visible only on listings pages.
Excerpt (core field type)
The WordPress Excerpt is an optional summary or description of a listing; in short, a listing summary. Can't be ordered by its value, can't be searched by its value. By default this field is shown on index and excerpt pages and hidden only on listings pages. It is possible to set up max length of output, also possible to use cropped content as excerpt, when excerpt field is empty - cropped main content will be used (look at Listings settings tab).
Listings addresses (core field type)
This is a block of listing locations and addresses. Can't be ordered by its value, can't be required, has special search block. This block of fields is controlled by locations manager and listings levels settings.
Listings categories (core field type)
This is a block of categories, those were assigned to listing. Can't be ordered by its value, can't be required, has special search block. This block of fields is controlled by categories manager and listings levels settings.
Listings tags (core field type)
This is a block of tags, those were assigned to listing. Can't be ordered by its value, can't be required.
Text string
Uses to insert short text/string data, for instance, phone number. At the backend display as pure HTML input element. Can be ordered by its value, can be required, can take part in search. Has own special configuration and search configuration options:
Max length - max number of characters allowed in this field.
PHP RegEx template - this interesting option allows to set the format of field. For example, such RegEx: \(?([1-9]\d{2})(\)?)(-|.|\s)?([1-9]\d{2})(-|.|\s)?(\d{4}) matches phone number format: (xxx) xxx-xxxx
Textarea
Uses to insert long text data and/or HTML data. Can't be ordered by its value, but its values make take part in search (as separate search field, not keywords search field). Some configuration settings: "HTML editor enabled" to enable richtext editor, "Run shortcodes" - enable to process shortcodes inside this field, also have "Max length" setting.
Number
Uses to insert numeric data. At the backend displays as pure HTML input element. Can be ordered by its value, can be required, can take part in search. Has own special configuration options:
Is integer or decimal - choose how to format the value of this field.
Decimal separator - possible values: dot or comma.
Thousands separator - possible values: no separator, dot, comma or space.
Min - you may set minimum bound of this field. Leave empty if you do not need to limit this field.
Max - you may set maximum bound of this field. Leave empty if you do not need to limit this field.
Special search configuration options:
Search mode - 4 modes available:
- enter exact number in search field
- provide an ability to search using min-max combination of select boxes
- search range slider with steps from Min-Max options
- search range slider with step 1, enter exact range
Min-Max options - when second search mode selected - just complete the list of options.
Select list
At the backend displays as selectbox HTML input element. Can't be ordered by its value, but its values may take part in search. On configuration page admin may complete selection items, also on the search form these items will be rendered as a group of checkboxes HTML inputs or selectbox or radio buttons group - this depends on search configuration setting: "Search input mode".
Radio buttons
Fields of this type inherit all features and settings from "select list" field type. At the backend displays as radio buttons group of HTML input elements. On the search form these items will be rendered as a group of checkboxes HTML inputs or selectbox or radio buttons group - this depends on search configuration setting: "Search input mode".
Checkboxes
Fields of this type inherit all features and settings from "select list" field type. At the backend displays as checkboxes group of HTML input elements. At the frontend this field looks like HTML unordered list. On the search form these items will be rendered as a group of checkboxes HTML inputs or selectbox or radio buttons group - this depends on search configuration setting: "Search input mode".
Website URL
At the backend this is combination of 2 HTML inputs: the first input for a URL of link and the second for a text of link. Can't be ordered by its value, can't take part in search. At the frontend looks like a link. Has 5 configuration settings:
Open link in new window - when checked - the system adds target="blank" attribute to the link.
Add nofollow attribute - when checked - the system adds rel="nofollow" attribute to the link.
Enable link text field - possible to hide text link input and the text of link will be its URL in any case.
Default link text - this is default text for the link.
Use default link text when empty - when checked - empty inputs will be replaced by default link text. When unchecked - for empty inputs the URL will be displayed as link text.
At the backend displays as pure HTML input element. Can't be ordered by its value, can't take part in search. At the frontend looks like mailto link.
Date-Time
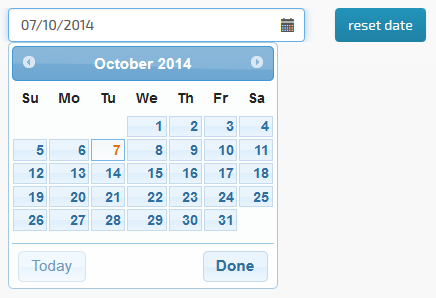
At the backend this field inherits the behaviour of jQuery UI datepicker widget. Has special configuration setting to include time-selection feature.
Can be ordered by its value. Also in the search block this field renders as 2 separate inputs to search by date range.
Price
Fields of this type has very much like behaviour as number field type, but it is always decimal and besides "Decimal separator" and "Thousands separator" settings it owns 2 additional configuration settings: "Currency symbol" and "Currency code". The same special search configuration options: "Search mode" and "Min-Max options list". "Search range slider with steps from Min-Max options" mode on the image below:

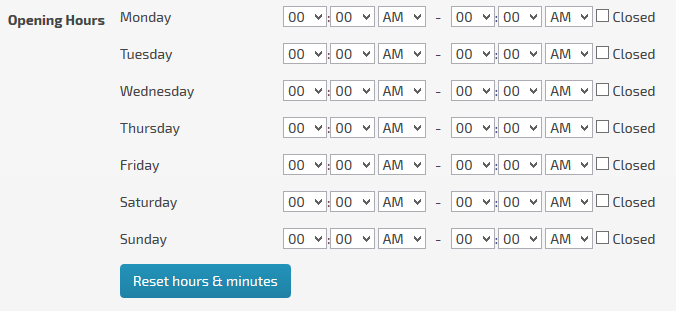
Opening hours
The only configuration option is "Time convention" - 12-hours clock or 24-hours clock.
Category-specific content fields
As was told earlier, it is possible to set some fields (except core fields) to function only when exact specific categories were checked on listings administration page. The same functionality appears at the search block. This is important and powerful feature allows to build category-specific content fields.
For instance: there may be one ‘price’ field especially in ‘Classifieds/For sale’ category and all its subcategories, so this field will appear only in listings, those were assigned with those categories.
Content fields groups

This functionality allows to combine separate content fields into groups (including core fields). There is an ability to place content fields group on a separate tab on single listing page, also ability to hide content fields group from anonymous users - they will only see the link to login page "You must be logged in to see this info".
Directory listings
Listings of the directory very much like standard WordPress posts, except some things and additional features. Creation of new listing begins with choosing of listing level (when there are more than 1 level in the system). This is the first step and it defines functionality and behaviour of newly created listing.
Listings creation and management
Listings administration page may contain standard fields and metaboxes such as: title field, richtext editor for listing description, slug and excerpt fields, comments metabox. Also, according to the level of current listing, this page contains special metaboxes: listing categories, listing locations, content fields, media metabox with forms for images uploading and YouTube videos embedding.
When you click "Update" or "Publish" button on the listing administration page - the system tries to save listing details, when all required conditions were kept (all required fields completed, matched their formats and location, categories, images, videos items do not exceed their limits) - the listing will be saved successfully, the listing status becomes "active" and the system sets expiration date (when the active period of level of current listing is not eternal). If something goes wrong - the post status becomes "draft" and warning message with the list of issues appears. Note, that title field is required.
Each directory listing has special metabox on its administration page:
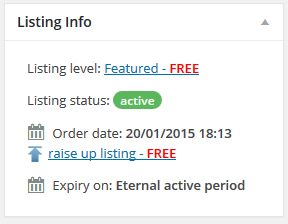 "Listing Info" metabox have some information fields: choosen listing level, listing status, order date and expiration date.
Note: listing status IS NOT the same thing as post status, listing status may be "active", "expired" or "unpaid". Post status may be "published", "pending review" or "draft".
Listing row on "Directory listings" page and "Listing Info" metabox place possible "raise up listing" and/or "renew listing" links.

Raise up listing option
This option displays when the level of current listing has "Ability to raise up listings" enabled setting. This feature will raise up the listing to the top of all lists, those ordered by date. For more information look at the sorting section. This feature may be payment.
Renew listing option
This option displays when level of current listing has not enabled "Eternal active period" and current listing is under "expired" status. This feature processes directory listing renewal. After renew process was completed successfully the listing status becomes "active" and the system sets new expiration date. Also this function raises up the listing to the top of all lists, those ordered by date. This feature may be payment.
Listings upgrade
"Directory Admin -> Listings upgrade" page contains following table with options:
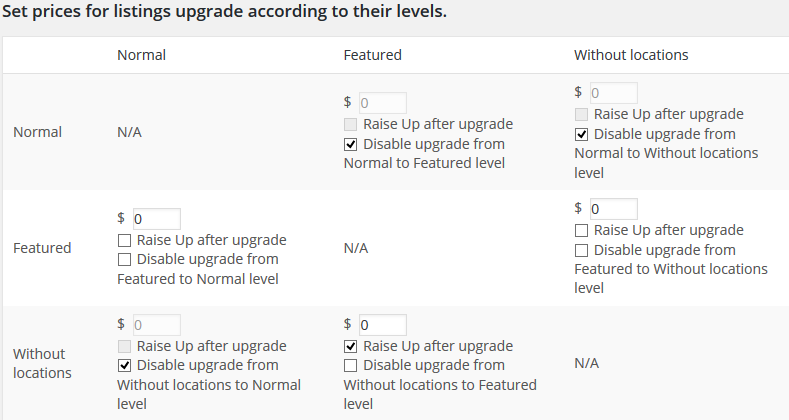
This feature may be payment, just set prices for listings upgrade according to their levels. It is possible to disable levels upgrade. Also after successful upgrade listing may be raised up. When this service is not free - successful upgrade means when invoice was completed and paid.
Search block and advanced search block
Search block divided in 3 sections: "What search", "Where search" and "Advanced search block"
What search section
This section includes keywords search field. Also allows to use categories filter and search by content fields, not all content fields have an ability to search listings by their values.
Where search section
There are locations search filter and "Search by address or zip code" field in this section. "Search by address or zip code" field is the autocomplete field, this helps users to choose item from existed addresses or zip codes.
Advanced search block
This block is hidden by default and used only for search by content fields. You may choose to hide search content field under "Advanced search" link, in order to make search block a bit smaller when there are lots of search fields enabled.
Sorting of listings
Each frontend page that displays the list of listings has "Order by" set of links.
By default on the top appear sticky and featured listings only when they sorted by date, in other case they sorted exactly by title, rating, additional content fields values, but there is such option "Sticky and featured listings always will be on top". So it is additional tool for commerce model of the directory site - place listings of sticky or featured levels higher than other listings. Then at the second stage each list sorts by date (here may be useful "raise up listings" feature), except search by radius page. When user searches listings in radius - default sorting is by distance from center point.
Some content fields also may take part in sorting. Clicking sorting links allows to change order direction from ascending to descending and vice versa.
You may find special sorting settings including "Default order by" setting on "Pages & Views" tab.
When ratings addon enabled - in the "Order by" set of links appears new option to order by listings rating.
Special attention to sticky listings - they are have higher priority under featured and other listings.
Google Maps and Marker Icons
Markers Icons depends on the type selected in directory settings.
Frontend page may render empty map when there aren't any listings with assigned locations and defined markers. It is possible to disable maps on index or excerpt pages on Maps & Addresses tab of directory settings page.
Here is simple example of how Google map looks with custom marker icons and special radius search layer:
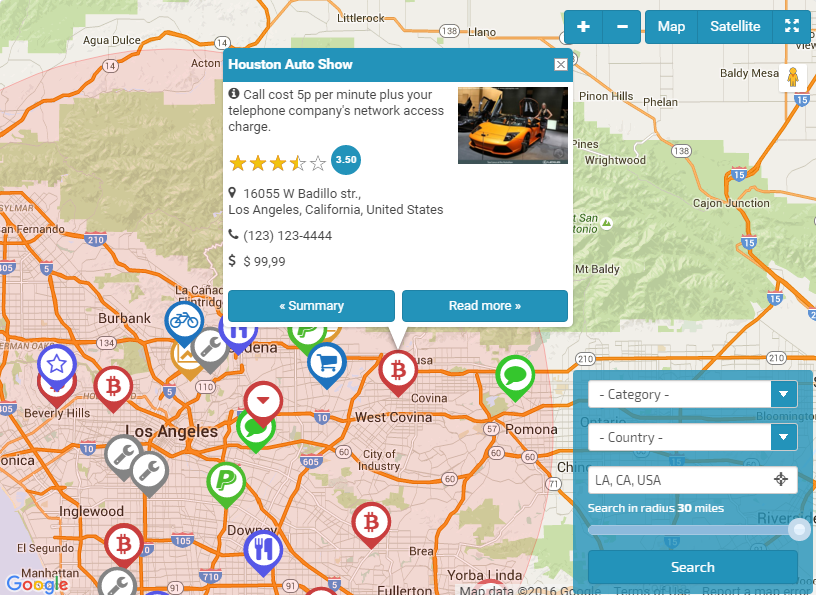
When appropriate level setting is checked (Custom markers on google map) - during listings creation/edition users may select custom marker icons.
During listings creation/edition there is an option to set marker coordinates (latitude and longitude) manually or by drag & drop of existing marker by mouse.
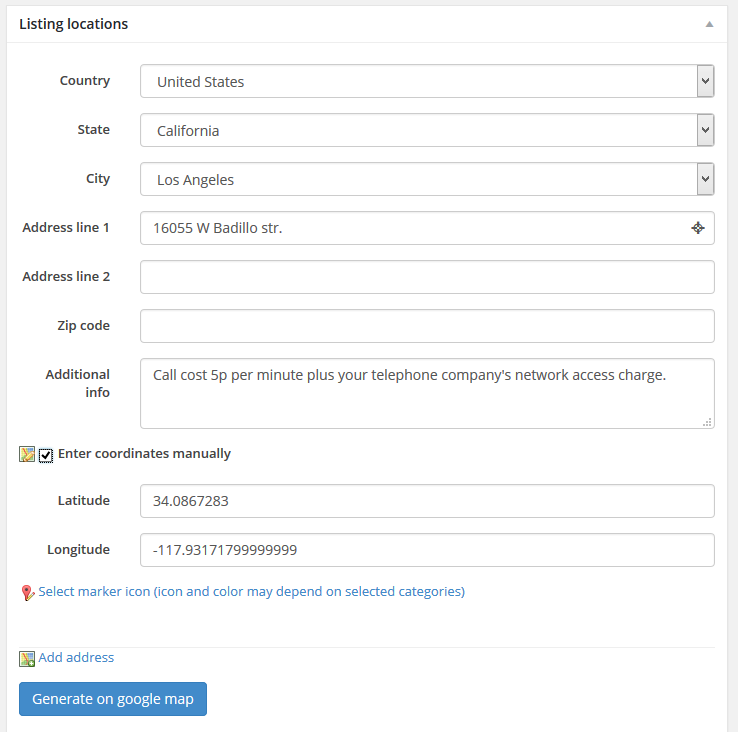
Clicking "Generate on google map" button processes targeting and compiling of addresses to render markers on the map.
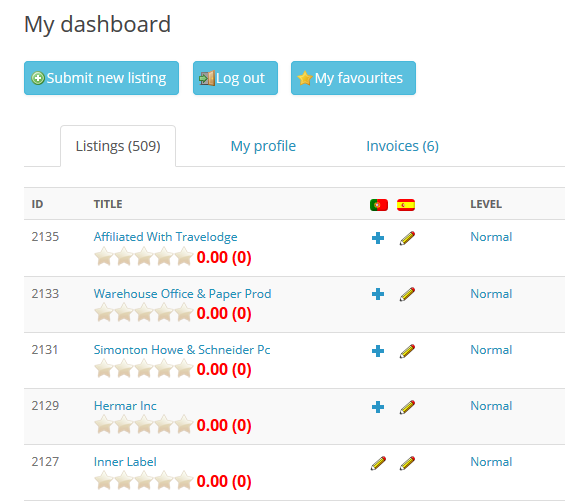
Frontend dashboard & submission
These features become available when "Frontend submission & dashboard addon" was enabled.
Create new page with [webdirectory-dashboard] shortcode if you wish your logged in users to manage their listings, invoices and profile on the frontend dashboard page.
"Submit new listing" button appears on front panel, clicking this button - users start the process of listing creation divided in some steps. Note, that the page with [webdirectory-submit] shortcode required.
Special note: additional pages with [webdirectory-submit] and [webdirectory-dashboard] shortcodes must not have main directory page with [webdirectory] shortcode as parent.
Number of submission steps varies according to different conditions: log in step may be missed if user was already logged in, payment step either doesn't required for free listings. After successful submission new listing will be created and in case of payment listing user will be redirected to invoice page to select payment gateway. According to "Post status after frontend submit" setting listing post status will become: Pending Review, Draft or Published.
There are some settings for frontend submission addon.
Payments
This option becomes available only when "Payments addon" was enabled.
Invoices management page appears at the backend. Authors have access only to own invoices, administrators have permissions to manage any invoices. With enabled "Frontend submission & dashboard addon" users may manage invoices at their frontend dashboard page.
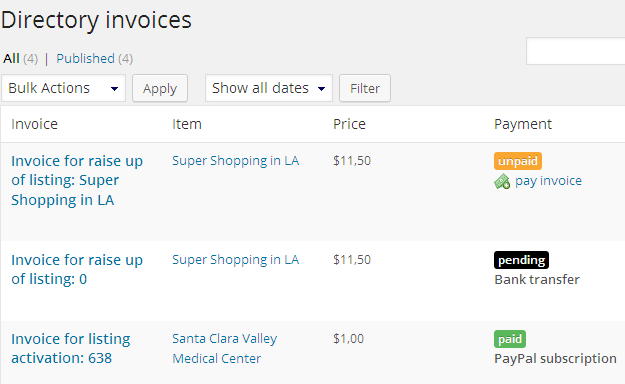
Each invoice has one of following statuses: unpaid, pending or paid. Invoice item - is an object to which this invoice belongs to.
There are 5 types of pay services:
- listings activation - this type of service available for subscription and one time payment. After successful payment the listing status becomes “active” and displays at the frontend.
- listings renewal - this type of service available for subscription and one time payment. This feature processes directory listing renewal. After renew process was completed successfully the listing status becomes “active” and the system sets new expiration date.
- listings raise up - this is the service for one time payment. This feature will raise up the listing to the top of all lists, those ordered by date. For more information look at the sorting section.
- listings upgrade – this is one time payment service. Charge users if they wish to upgrade their simple listings to featured or sticky.
- listings claim – after successful approval of claim new owner need to pay to renew the listing.
Invoice management page provides whole information about current invoice: the reason of invoice, invoice item, invoice status, author, price, item options, also invoice log - this is the history of actions processed with this invoice. Also taxes information available when taxes functionality was enabled.
Users are allowed to process some actions with invoices, such as print invoice with all assigned information or reset selected gateway. Also there is special action button "Set as paid" only for administrators. This allows to set up invoice status as paid manually and processes further actions. Usually this needed to complete invoices with chosen "Bank transfer" payment gateway.
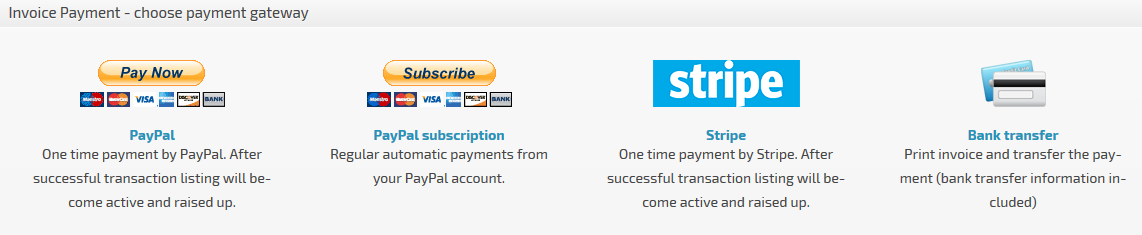
Available payment gateways:
- PayPal - this method for one time payment.
- PayPal subscription - users may use this method to process automatic recurring payments. Look at additional information below.
- Stripe - a beautiful, optimized, cross-device, payment form.
- Bank transfer - this is semi-automatic method of payment. User selects this method, prints invoice, transfers the payment to vendor, then when site administrator will receive payment - he will manually set invoice as paid by special action button "Set as paid".
PayPal Subscriptions
Using this payment gateway directory listings owners do not need to prolong their ads each time they have been expired. They may choose to open subscription and pay automatically by recurring cycle. The only condition is that PayPal accepts only one duration unit - this means that active period of listings for subscription must be only in days, months or years, in other case active period may be rounded. So it is recommended to set active period only in days, only in months or only in years. Examples:
- advertisement active period 3 days and 2 months - rounded to 2 months
- advertisement active period 15 days, 2 months and 1 year - rounded to 14 months
- advertisement active period 30 days and 1 month - rounded to 1 months
- advertisement active period 30 days - this will not be rounded
Also, please note, that PayPal subscriptions available only for listings, those do not have eternal (unlimited) active period.
Special note: PayPal single payment and PayPal subscriptions require enabled permalinks on WordPress "Settings -> Permalinks" page.
After activation of payments module - on directory settings page new tab "Payments" will appear with payments settings.
Directory widgets
Web 2.0 Directory plugin provides 4 types of widgets: listings, categories, search and social. Each widget type has own settings. Title setting is common for all widgets, also one common setting "Show only on directory pages", by enabling this setting the widget will appear only on directory pages: home directory page, categories and tags listings pages, search page, single listing pages.
Listings widget
This widget renders the list of the most recent listings ordered by date. You may set the number of listings to display, also configure to place sticky and featured listings on top of the list or to display only sticky and featured listings.
Categories widget
Categories widget renders the list of directory categories with their icons. Available settings: categories nesting level - when set to 1 – only root categories will be listed. Also it is possible to display the number of listings of each category item. "Show subcategories items number" - this is the number of subcategories those will be displayed in the table, when category item includes more than this number "View all subcategories ->" link appears at the bottom. "Parent category" - enter ID of parent category to display only its children, leave 0 to show all root categories.
Locations widget
Locations widget renders the list of directory locations with their icons. Available settings: locations nesting level - when set to 1 – only root locations will be listed. Also it is possible to display the number of listings of each location item. "Show sublocations items number" - this is the number of sublocations those will be displayed in the table, when location item includes more than this number "View all sublocations ->" link appears at the bottom. "Parent location" - enter ID of parent location to display only its children, leave 0 to show all root locations.
Search widget
This widget displays directory search form in the view adapted for sidebars. Widget search form has the same search fields as main search form. There is a setting that allows to hide search widget when main search form is already on the page.
Social widget
Displays icons with links to your social accounts. You may set separate URLs for each social account. Also the link to your RSS feed.
Custom Home Page
By default the order of content blocks of [webdirectory] shortcode can not be changed: search form, categories block, google map, listings block. But there is a possibility to set up custom layout.
When you set up [webdirectory custom_home=1] – the shortcode displays only listings, no map, no categories block, no search form. This special mode allows to build custom directory home page as you wish using additional shortcodes:
- [webdirectory-categories custom_home=1] - categories shortcode renders corresponding categories navigation menu.
- [webdirectory-map custom_home=1] - Google map with custom_home=1 parameter displays markers of assigned listings locations from [webdirectory custom_home=1]
The plugin is fully compatible with WordPress Visual Composer plugin, this is the best way to build pages using VC plugin with its amazing backend editor.

Customization
The customization of the directory does require some experience with HTML, CSS and even PHP to change the templates around to an arbitrary theme look. Plugin templates are designed to work relatively well with most themes, but if you do have the need to override these templates to match your theme please try to follow these conventions:
- if you want to change the layout or styles of directory section on your site do not modify existing CSS files, instead copy them and give exactly the same name to new file, just add "-custom" postfix to the end of name before file's extension. For example, w2dc/resources/css/frontend.css file must be named w2dc/resources/css/frontend-custom.css. Using such method will save your modifications during further updates
- the same convention for any templates - .tpl files in "w2dc/templates/" folder. For example, custom "w2dc/templates/frontend/index.tpl.php" template must be named "w2dc/templates/frontend/index-custom.tpl.php"
- other part of customization is that you may manage categories icons, locations icons, map markers icons and content fields icons
The inclusion of CSS files on frontend pages has following order:
- w2dc/resources/css/bootstrap.css - basic CSS rules
- w2dc/resources/css/frontend.css - main file, controls the layout of directory markup
- wp-content/uploads/w2dc-plugin.css, special CSS file for dynamic plugin options
- w2dc/resources/css/frontend-custom.css - (optional) custom main fronted file
- w2dc/addons/w2dc_payments/resources/css/payments.css - CSS file from payments addon
- w2dc/addons/w2dc_payments/resources/css/payments-custom.css - (optional) custom CSS file for payments addon
- w2dc/addons/w2dc_ratings/resources/css/rater.css - CSS file from ratings addon
- w2dc/addons/w2dc_ratings/resources/css/rater-custom.css - (optional) custom CSS file for ratings addon
- w2dc/addons/w2dc_fsubmit/resources/css/submitlisting.css - CSS file from frontend submission addon
- w2dc/addons/w2dc_fsubmit/resources/css/submitlisting-custom.css - (optional) custom CSS file for frontend submission addon
The directory has special customization settings to change some elements on frontend pages like links and buttons colors, backgrounds of search, categories, locations blocks, primary color, jQuery UI style and so on.
How to modify texts and strings
If you use WordPress in English and simply want to modify texts and strings of the plugin follow these steps:
- on "Settings -> General page select needed site language
- now you are able to work with default "languages/W2DC-en_US.po" file and modify any texts and strings using poEdit
- Every time you save W2DC-en_US.po file, PoEdit automatically generates W2DC-en_US.mo file, which is the one WordPress uses and basically the only one you need to upload on the server
Always backup W2DC-en_US.po and W2DC-en_US.mo files in order to save your changes after plugin upgrade.
Translations & Multi-Language Support
Web 2.0 Directory plugin is fully adapted for translations - look at "languages/" folder with .pot and .po files. Use poEdit to translate .pot files. The process of translation is similar to modifying texts and strings:
- duplicate the .pot file and rename it to W2DC-lang_COUNTRY.po
- Example for the referenced plugin case: W2DC-pt_BR.po
-- pt_BR means Portuguese Brazil, but many languages don't have a country variation...
-- you'll have to fill in with your own language - on "Settings -> General page select needed site language
- Every time you save translated *.po file, PoEdit automatically generates a *.mo file, which is the one WordPress uses and basically the only one you need to upload on the server
Always backup *.po and *.mo files in order to save your changes after plugin upgrade. Or you may place these files into "wp-content/languages/plugins/" folder.
WPML
The plugin fully compatible with WPML plugin. It allows to easily translate directory listings, directory categories, tags, predefined locations. Also users may manage listings translations at the frontend of the site.
Note: main directory page must have translations in those languages you wish to operate. The same thing with dashboard and submission pages.
When user clicks "Add translation to ..." button ![]() - new copy of corresponding listing in selected language will be created. This will be exact copy of listing from the original language, directory categories, locations and content fields assigned with this listing will be copied either.
- new copy of corresponding listing in selected language will be created. This will be exact copy of listing from the original language, directory categories, locations and content fields assigned with this listing will be copied either.
Note, that listing operations are strongly connected beetween translations, this means that when user or admin clicks to activate, renew, raise up, change listing level or when the active period of listing expires - all related translations also will process these oprations. But content of translations is independent, also each translation may be deleted independently.
When WPML plugin is active - new setting appear on Advanced tab of directory settings page:
Enable frontend translations management - this allows to manage translation directly from frontend dashboard.
CSV Import
We place sample CSV file into "documentation/" folder in the plugin archive.
- On the second step of importing you'll collate CSV headers of columns with existing listings fields, this means there isn't fixed format for CSV files.
- The only required columns in CSV file those define new listings titles and level IDs. Also information about author must be provided - in any column of CSV file or by setting existed author in import settings.
- In order to assign categories/tags with each listing - specify category/tag slugs in one CSV column and separate them with special delimiter. This delimiter must be any string character, but not the same as the delimiter for separation of CSV columns.
- You may set to auto-create new directory category/tag. In such case, when there isn't any existing category/tag with provided slug - new root category/tag will be created automatically and that string in the CSV column will be used as category/tag name.
- MultiValues - are such fields, those may have more than one value, for example, checkboxes content field. Separate them in one CSV column with special delimiter in the same way as for assigned categories.
- Also you may upload ZIP archive with images files for new listings. Specify names of images files in one CSV column and separate them with special delimiter in the same way as for assigned categories. Note, that images files must be in the root inside ZIP archive, not inside folder.
- By default listings authors will be specified in one of CSV columns, there must be existed user ID, user login or user email. Also you may switch to assign all new listings with one specific existed user.
- 2 possible ways to import addresses and locations for new listings: define already existed directory location ID or you may select up to 4 address parts in different CSV columns (e.g., building number in one column, street in another column, city in separate column, ......). Also you may set special column for names of existed map icons files: for example, there is such map marker icon file "w2dc/resources/images/map_icons/icons/_new/Boat.png", so you have to place "_new/Boat.png" into CSV column. Using Font Awesome icons just place the name of icon "w2dc-fa-automobile".
- When you do not have latitude/longitude information for Google Maps markers - Google geocoding service may be used to build markers points from addresses (CURL extention required), but you can only import maximum of 2500 addresses per day, this is the max query limit of the Google geocoding service, unless you have a Google Maps API business license.
- There is an option to configure all imported listings as claimable, this option is shown when frontend submission addon was enabled and also claim functionality was switched on.
- When the size of your CSV file is very large - this may slow down the server and break the process of import, you may try to split the file into smaller CSV files.
- Recommended to make whole backup of the database before import.
Table of Contents
- Installation
- Getting started
- Directory settings
- Directory categories
- Directory locations
- Listings levels
- Content fields
- Directory listings
- Search block and advanced search block
- Sorting of listings
- Google Maps and marker icons
- Frontend dashboard & submission
- Payments
- Widgets
- Custom home page
- Customization
- How to modify texts and strings
- Translations & multi-languages support
- CSV Import